Category: Devops

Here’s to devops…a poem

In devops, we're constantly on call 
Our work is never done, no matter how small 
We're always ready to troubleshoot and fix 
Our skills are diverse, our knowledge is mixed
We're agile and flexible, always adapting 
We're proactive, we're never static 
We're experts in automation and efficiency 
We're the bridge between development and IT
We're passionate about our craft 
We strive for continuous improvement, it's what we're after 
We're the glue that holds everything together 
We're the unsung heroes, working in all kinds of weather
So here's to devops, the backbone of technology 
We may not always get the recognition, but we do it proudly 
We're a vital part of the team, and we know our worth 
We're the devops engineers, bringing stability to this earth

AWS EC2 Spot – Best Practices

Amazon’s EC2 has several options for running instances. On-demand instances is what would be used by most. Reserved instances are used by those who can do some level of usage prediction. Another option which can be a cost saver is using Spot instances. Amazon claims savings up to 90% off regular EC2 rates using Spot instances.

AWS operates like a utility company as such it has spare capacity at any given time. This spare capacity can be purchased through Spot instances. There’s a catch, though. With a 2 minute warning, Amazon can take back that “spare capacity” so using Spot instances needs to be carefully planned. When used correctly Spot instances can be a real cost-saver.

When to use Spot instances

There is a fairly broad set of use cases for using Spot instances. The general consensus is simply containerized, stateless workloads, but in reality there’s a lot more.

  • Distributed databases – think MongoDB or Cassandra or even Elasticsearch. These are distributed so losing one instance would not affect the data; simply start another one
  • Machine Learning – typically these are running training jobs and losing it would only mean the learning stops until another one is started. ML lends itself well to the Spot instance paradigm
  • CI/CD operations – this is a great one for Spot instances
  • Big Data operations – AWS EMR or Spark are also great use cases for Spot instances
  • Stateful workloads – even though these applications would need IP and data persistence, some (maybe even all) of these may be candidates for Spot instances especially if they are automated properly.

Be prepared for disruption

The primary practice for working in AWS in general, but also working with Spot instances is be prepared. Spot instances will be interrupted at some point when it’s least expected. It is critical to create your workload to handle failure. Take advantage of EC2 instance re-balance recommendations and Spot instance interruption notices.

The EC2 re-balance recommendation will notify of an elevated risk of Spot instance interruption in advance of the “2 minute warning”. Using the Capacity Rebalancing feature in Auto-scaling Groups and Spot fleet will provide the ability to be more proactive. Take a look at Capacity Rebalancing for more detail.

If the workloads are “time flexible” configure the Spot instances to stop or hibernate vs terminated when an interruption occurs. When the spare capacity returns the instance will be restarted.

Use the Spot instance interruption notice and the Capacity rebalance notice to your advantage by using the EventBridge to create rules to gracefully handle an interruption. One such example is outlined next.

Using Spot instances with ELB

In a lot of cases Elastic Load Balancer (ELB) is used. Instances are registered and de-registered to the ELB based on health check status. Problem with Spot instances is the instance do not de-register automatically so there may be some interruption if the situation is not handled properly.

The proper way would be to use the interruption notice as a trigger to de-register the instance from the ELB. By programmatically de-registering the Spot instance prior to termination traffic would not be routed to the instance and no traffic would be lost.

Easiest way is to use a Lambda function to trigger based on a Cloudwatch instance termination notice. The Lambda function simply retrieves the instance ID from the event and de-registers the instance from the ELB. As usual, Amazon Solution Architects showed how to do it on the AWS Compute Blog.

Keep your options open

The Spot capacity pool consists of a set of unused EC2 instances with the same instance type (t3.micro, m4.large, etc) and Availability Zone (us-west-1a). Avoid getting too specific on instance types and what zone they use. For instance, avoid specifically requesting c4.large if running the workload on a m5, c5, or m4 family would work the same. Keep specific needs in mind, vertically scaled workloads need more resources and horizontally scaled workloads would find more availability in older generation types as they are in less demand.

Amazon recommends being flexible across at least 10 instance types and there is never a need to limit Availability Zones. Ensure all AZs are enabled in your VPC for your instance to use.

Price and capacity optimized strategy

Take advantage of Auto Scaling groups as the allocation strategies will enable provisioning capacity automatically. The price-capacity-optimized strategy in Spot Fleet due to how the instance capacity is sourced from pools with optimal capacity. This strategy will reduce the possibility of having the Spot instance reclaimed. Dig into the Auto Scaling User Guide Spot Instances section for more detail. Also take a look at this section which describes when workloads have a high cost of interruption.

Think aggregate capacity

Instead of looking at individual instances, Spot enables a more holistic view across units such as vCPUs, network, memory, or storage. Using Spot Fleet with Auto Scaling Groups allows for a higher level view enabling the concept of “target capacity”. Automating the request for more resources to maintain the target capacity of a workload enables considerable flexibility.

Other options to consider

Amazon has a considerable number of services which can be integrated with Spot instances to manage compute costs. Used effectively these services will allow for more flexibility and automation eliminating the need to manage individual instances or fleets. Take a look at the EC2 Spot Workshops for some ideas and examples.

Devops Toolkit for Automation

In the DevOps methodology automation is likely the most important concept. Use “automate everything” as a mantra daily.

Image by Michal Jarmoluk from Pixabay

As an “operator” working in a DevOps role good tools are a necessity. Tools which allow for automating most everything is crucial to keeping up with the vast amount of changes and updates created in a Agile development environment.

Using the same tools your counterparts on the team use will allow for expediting the learning process. In a lot of cases developers use a IDE (Integrated Development Environment) of some sort. Visual Studio Code comes to the forefront, but some ‘hardcore’ or ‘old school’ developers still use Emacs or even Vim as their development tool of choice. There are many out there and each has its pros and cons. Along with a IDE there will be the need for extensions to make things simpler. Let’s outline a few and focus on Visual Studio Code as the tool of choice.

Visual Studio Code is available for most of the commonly used platforms. It has a ton of extensions, but as a “DevOps Engineer” you’ll need a few to make your life easier. First and foremost you’ll want extensions to make working with your favorite cloud provider easier. There are plugins for AWS, GKE, and AKS as well as plugins for yaml, Kubernetes, and Github.

Another extension necessary for container development is the Remote Development Extension Pack. This extension provides the Dev Containers extension allowing for the opening of files and folders inside a container. It also provides a SSH extension to simplify access to remote machines. The Dev Containers extension will want to use Docker Desktop, but a better alternative is Rancher Desktop.

Rancher Desktop is another superb tool for several reasons.

  • 100% open source
  • Includes K3s as the Kubernetes distribution
  • Can use with dockerd (moby) or containerd
  • Basic dashboard
  • Easy to use

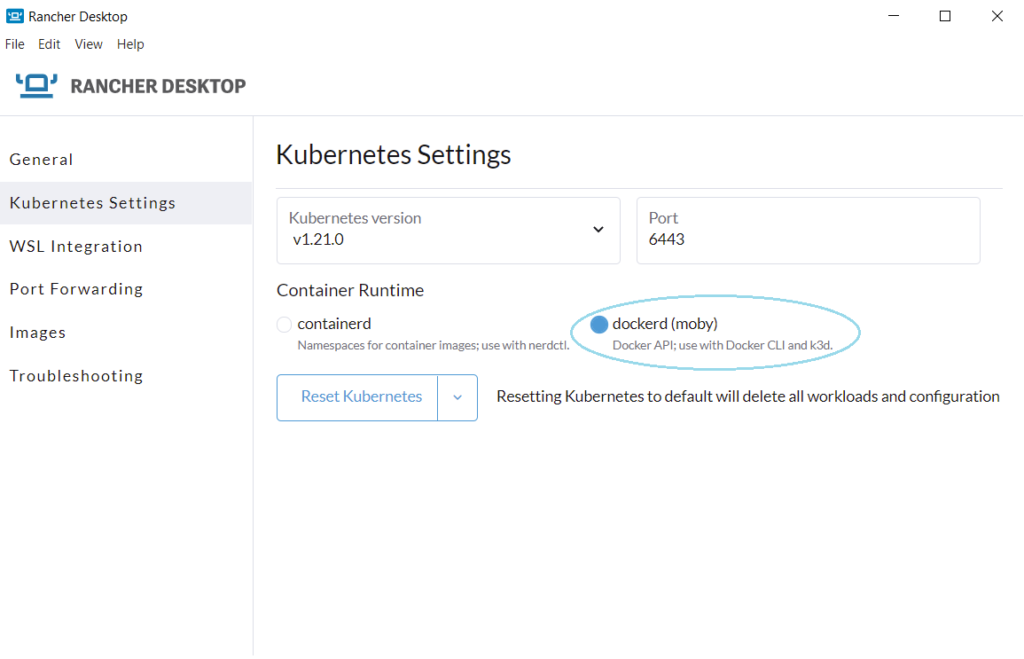
To get started with it, download Rancher Desktop and install on your favorite platform. Follow the installation instructions and once installed go to the preferences page and select “dockerd (moby)” as shown below.

Rancher Desktop Kubernetes Settings

Now that you have Rancher Desktop installed as well as Visual Studio Code with all of the extensions take some time to get familiar with it. Best to start with your github account and create or fork a repository to work with inside Visual Studio Code. Reading through the various getting started docs yields hours of things to try or work with to learn.

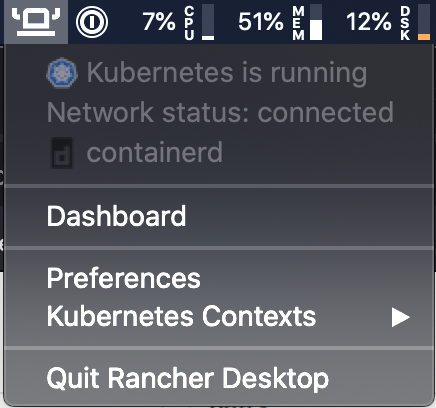
To get started with your Rancher Desktop cluster simply click on the Rancher Desktop icon. In most windowed environments there’s a icon in the “task bar”.

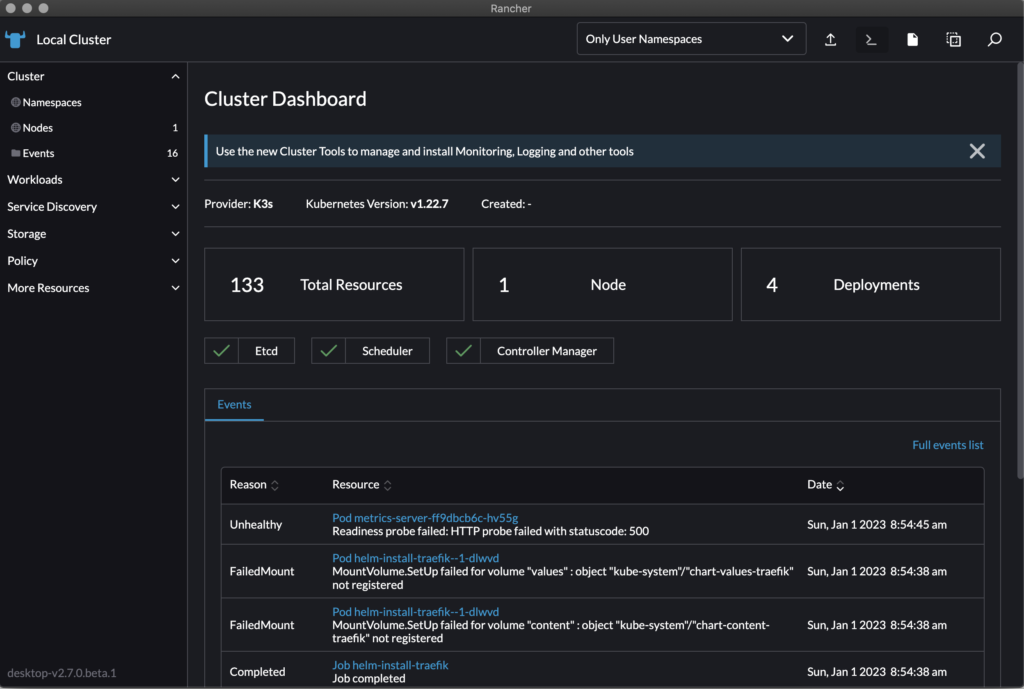
Click on the Dashboard link to get access to view the K3s cluster installed when Rancher Desktop started.

Another way to access the cluster is to use kubectl. A number of utilities were installed to ~/.rd/bin. Use kubectl get nodes to view the node(s) in your cluster or use kubectl get pods -A to view all of the pods in the cluster.

Many utilities exist to view/manage Kubernetes clusters. Great learning experiences come from experimentation.

A lot was accomplished in this post. From a bit of reading to manipulating a Kubernetes cluster there is a lot of information to absorb. Visual Studio Code will be the foundation for a lot of the work done in the DevOps world. Containers and Kubernetes will be the foundation for the execution of the work created. This post provided the building blocks to combine the Dev and the Ops with what’s needed to automate the process.

Next up…building a simple CI/CD pipeline.

Getting started in DevOps

Getting started in DevOps doesn’t have to be hard.

Image by Dirk Wouters from Pixabay

How do we get started…starting with some assumptions.

  1. You understand how to install and manage a Kubernetes cluster.
  2. You understand how to ‘git’ around. (heh…like the pun?)
  3. You know how CI/CD pipelines work.
  4. You understand some development. Or at least you know how to get around tools like VSCode.

There’s plenty of knowledge to be found here so let’s get started.

In most cases companies needing people who understand DevOps best practices are either starting on or already executing a Digital Transformation journey. These journeys are just that, a journey so grab a seat, buckle up, and enjoy the ride. This particular ride involves a lot of buzzword bingo games. There will be plenty of opportunity for playing that game later.

Getting started on the journey

The first part of every journey is preparing for it. It helps to learn a bit more about the destination before embarking on the actual journey to that destination so watch for the buzzwords. The first thing to note is a lot of enterprises have a lot of technical debt. Suffice to say there will be a lot of work for far more developers than there are resources for said developers. From ancient Microsoft .net work to crufty java, there’s plenty of history in those binaries. One of the goals may be to modernize these applications. The fabulous book, “The Phoenix Project” describes how “Phil” takes a over budget and behind schedule modernization project to deployment utilizing effective collaboration and communication, crowdsourcing, and the “Three Ways”.

Hopefully “The Phoenix Project” helped to frame what is in store for embarking on the adventure into DevOps. The next steps are to put in practice some of the constructs outlined. One of the key tenants of the book was to ensure the “pipeline” has no obstructions as one single slow down will slow the entire line of work. This slow down will create bottlenecks which, in turn, will create a ripple effect on the entire process. These “pipelines” in a cloud native development world are part of the CI/CD process or continuous improvement, continuous development pipeline.

Other takeaways

Gene Kim outlined a few other takeaways in “The Phoenix Project” worth noting. The first one came from the need to work in smaller groups. Jeff Bezos is credited with creating the “Two Pizza Team” where the teams are limited in size (consume 2 pizzas per team). This is how a lot of the innovation came from within Amazon. Small, competitive teams who communicated very well. This small team concept leads to another concept of “microservices”.

Instead of monoliths where everything runs together, microservices breaks each service into a functional unit. Microservices are focused on putting services into the smallest possible unit of work. With smaller units of work comes smaller changes which can be committed and tested faster as well as tested locally in most cases. Microservices will be a key concept to note on this digital transformation journey. Microservices create the need for cross functional teams where communication and collaboration is key. This is where the concept of DevOps comes into play. Employing the DevOps methodologies is crucial to the success of a transformative project.

Enterprises around the world have endured a massive sea of change in the years since the Covid-19 pandemic started. Even as companies were beginning to embrace the concepts of digital transformation, Covid-19 forced an acceleration of this transformation if the enterprise wanted to survive. Embracing remote work was key to survival.

This post was simply an introduction. With the key concepts outlined subsequent related posts will focus more on a technical guide to the technology underneath embracing a DevOps methodology. With DevOps many tools exist to help in the many facets including how to create a culture within an organization capable of embracing the change needed to adopt ongoing transformation to adapt to even the slightest change in your organizations market.

Next up…the introduction of a Podman setup to start down the path of using, managing, and orchestrating containers.

Simplify using Podman instead of Docker

At this point most everyone using containers know of Docker, but is Docker right for your workload? Maybe not. If you plan on using Kubernetes to run your “cloud native” workloads, then it may be worthwhile to use a tool which was designed to run Kubernetes workloads originally. Another reason would be Podman is daemonless, whereas docker wants to control everything docker. Podman does not need root access to run containers. One final reason is Docker is a “one-stop” shop where Podman is modular. You install and use what you need with Podman like buildah to build images. Podman ends up being lighter weight and leaves the heavy lifting to other tools while maintaining OCI compliance and being more secure overall.

Ok so you are now convinced to move into the growing mainstream using Podman. Since you’ve been running Docker for a while you realized that you can add yourself to the docker group and all is good. It’s not so easy with Podman which is a REALLY good thing and makes Podman more secure. Let’s talk about about the why and we’ll get to the how momentarily.

Podman works a little different than Docker (shocker). Podman uses a subordinate system which is assigned to the user at runtime. With that being said, Podman would end up using more UIDs and SUBUIDs than Docker (docker uses the existing system for it’s UIDs). This means we need to “pre-assign” a block for Podman to use and we probably need to increase the defaults to support those additional UIDs and SUBUIDs.

Installing Podman is quite simple. Podman is available for most OS’s and architectures. For SUSE Linux, simply ‘zypper in podman’ will install it. You will want to also add slirp4netns using ‘zypper in slirp4netns’ (you may need to add the container module using ‘SUSEConnect -p sle-module-containers/15.4/x86_64’ replacing 15.4 with your SLE version and x86_64 with your architecture).

With Podman installed we now need to grant the user we want to run Podman with a block of SUBUIDs and SUBGIDs which may be outside what is normally used. Let’s use 200000-265536. Run the command:

sudo usermod –add-subuids 200000-265536 –add-subgids 200000-265536 $USER

Where $USER is “your user” or the user you want to run Podman commands (remember we’re avoiding sudo or root here).

Now you need to add more namespaces since the user may not have enough by default. Check the number available.

Use sysctl –all –pattern user_namespaces and if it is the default of 1000 you will want to increase that number.

Use sudo nano /etc/sysctl.d/userns.conf

Add user.max_user_namespaces=28633 to bump the available namespaces

Use sudo sysctl -p /etc/sysctl.d/userns.conf to load the new setting

And use sysctl –all –pattern user_namespaces to verify what you added.

Now it will be necessary to configure user networking. To do this we need to enable slirp4netns (it was installed earlier). To enable all of the default settings, reboot your node.

That’s it! A little more involved than using docker without sudo by adding your user to the docker group, but you are now using a more modern and secure tool for managing your containers!

New to DevOps? Start here…

New to the devops scene? Want to get started with a career supporting application operations, managing Kubernetes, running docker, or just browsing around. This site is going to be designed to provide some interesting anecdotes, entertaining articles, and how-tos for getting started with a career in the field of “devops”.

Ah yes…what is this “devops”. Everyone has an opinion for sure. Some call it a “paradigm“. That word has negative connotations though. Some actually feel it is a “engineering position”. Ok. Acceptable. Others just call it what it is…an operator who supports the development efforts of an enterprise. Dev-Ops. No matter, the idea here is to provide info for every opinion.

Want to know more about a topic whether it is Kubernetes, Application Development, Devops, or other enterprise datacenter topic? Speak up. Comments are welcome.

Next up…Getting Started in DevOps