Tag: Automation

Automating Kubernetes Clusters

Kubernetes is definitely the de facto standard for container orchestration, powering modern cloud-native applications. As organizations scale their infrastructure, managing Kubernetes clusters efficiently becomes increasingly critical. Manual cluster provisioning can be time-consuming and error-prone, leading to operational inefficiencies. To address these challenges, Kubernetes introduced the Cluster API, an extension that enables the management of Kubernetes clusters through a Kubernetes-native API. In this blog post, we’ll delve into leveraging ClusterClass and the Cluster API to automate the creation of Kubernetes clusters.

Let’s understand ClusterClass

ClusterClass is a Kubernetes Custom Resource Definition (CRD) introduced as part of the Cluster API. It serves as a blueprint for defining the desired state of a Kubernetes cluster. ClusterClass encapsulates various configuration parameters such as node instance types, networking settings, and authentication mechanisms, enabling users to define standardized cluster configurations.

Setting Up Cluster API

Before diving into ClusterClass, it’s essential to set up the Cluster API components within your Kubernetes environment. This typically involves deploying the Cluster API controllers and providers, such as AWS, Azure, or vSphere, depending on your infrastructure provider.

Creating a ClusterClass

Once the Cluster API is set up, defining a ClusterClass involves creating a Custom Resource (CR) using the ClusterClass schema. This example YAML manifest defines a ClusterClass:

apiVersion: cluster.x-k8s.io/v1alpha3
kind: ClusterClass
metadata:
  name: my-cluster-class
spec:
  infrastructureRef:
    kind: InfrastructureCluster
    apiVersion: infrastructure.cluster.x-k8s.io/v1alpha3
    name: my-infrastructure-cluster
  topology:
    controlPlane:
      count: 1
      machine:
        type: my-control-plane-machine
    workers:
      count: 3
      machine:
        type: my-worker-machine
  versions:
    kubernetes:
      version: 1.22.4

In this example:

  • metadata.name specifies the name of the ClusterClass.
  • spec.infrastructureRef references the InfrastructureCluster CR that defines the underlying infrastructure provider details.
  • spec.topology describes the desired cluster topology, including the number and type of control plane and worker nodes.
  • spec.versions.kubernetes.version specifies the desired Kubernetes version.

Applying the ClusterClass

Once the ClusterClass is defined, it can be applied to instantiate a Kubernetes cluster. The Cluster API controllers interpret the ClusterClass definition and orchestrate the creation of the cluster accordingly. Applying the ClusterClass typically involves creating an instance of the ClusterClass CR:

kubectl apply -f my-cluster-class.yaml

Managing Cluster Lifecycle

The Cluster API facilitates the entire lifecycle management of Kubernetes clusters, including creation, scaling, upgrading, and deletion. Users can modify the ClusterClass definition to adjust cluster configurations dynamically. For example, scaling the cluster can be achieved by updating the spec.topology.workers.count field in the ClusterClass and reapplying the changes.

Monitoring and Maintenance

Automation of cluster creation with ClusterClass and the Cluster API streamlines the provisioning process, reduces manual intervention, and enhances reproducibility. However, monitoring and maintenance of clusters remain essential tasks. Utilizing Kubernetes-native monitoring solutions like Prometheus and Grafana can provide insights into cluster health and performance metrics.

Wrapping it up

Automating Kubernetes cluster creation using ClusterClass and the Cluster API simplifies the management of infrastructure at scale. By defining cluster configurations as code and leveraging Kubernetes-native APIs, organizations can achieve consistency, reliability, and efficiency in their Kubernetes deployments. Embracing these practices empowers teams to focus more on application development and innovation, accelerating the journey towards cloud-native excellence.
Declarative vs Imperative Operations in Kubernetes: A Deep Dive with Code Examples

Kubernetes, the de facto orchestrator for containerized applications, offers two distinct approaches to managing resources: declarative and imperative. Understanding the nuances between these two can significantly impact the efficiency, reliability, and scalability of your applications. In this post, we’ll dissect the differences, advantages, and use cases of declarative and imperative operations in Kubernetes, supplemented with code examples for popular workloads.

Imperative Operations: Direct Control at Your Fingertips

Imperative operations in Kubernetes involve commands that make changes to the cluster directly. This approach is akin to giving step-by-step instructions to Kubernetes about what you want to happen. It’s like telling a chef exactly how to make a dish, rather than giving them a recipe to follow.

Example: Running an NGINX Deployment

Consider deploying an NGINX server. An imperative command would be:

kubectl run nginx --image=nginx:1.17.10 --replicas=3

This command creates a deployment named nginx, using the nginx:1.17.10 image, and scales it to three replicas. It’s straightforward and excellent for quick tasks or one-off deployments.

Modifying a Deployment Imperatively

To update the number of replicas imperatively, you’d execute:

kubectl scale deployment/nginx --replicas=5

This command changes the replica count to five. While this method offers immediate results, it lacks the self-documenting and version control benefits of declarative operations.

Declarative Operations: The Power of Describing Desired State

Declarative operations, on the other hand, involve defining the desired state of the system in configuration files. Kubernetes then works to make the cluster match the desired state. It’s like giving the chef a recipe; they know the intended outcome and can figure out how to get there.

Example: NGINX Deployment via a Manifest File

Here’s how you would define the same NGINX deployment declaratively:

apiVersion: apps/v1
kind: Deployment
metadata:
  name: nginx
spec:
  replicas: 3
  selector:
    matchLabels:
      app: nginx
  template:
    metadata:
      labels:
        app: nginx
    spec:
      containers:
      - name: nginx
        image: nginx:1.17.10

You would apply this configuration using:

kubectl apply -f nginx-deployment.yaml

Updating a Deployment Declaratively

To change the number of replicas, you would edit the nginx-deployment.yaml file to set replicas: 5 and reapply it.

spec:
  replicas: 5

Then apply the changes:

kubectl apply -f nginx-deployment.yaml

Kubernetes compares the desired state in the YAML file with the current state of the cluster and makes the necessary changes. This approach is idempotent, meaning you can apply the configuration multiple times without changing the result beyond the initial application.

Best Practices and When to Use Each Approach

Imperative:

  • Quick Prototyping: When you need to quickly test or prototype something, imperative commands are the way to go.
  • Learning and Debugging: For beginners learning Kubernetes or when debugging, imperative commands can be more intuitive and provide immediate feedback.

Declarative:

  • Infrastructure as Code (IaC): Declarative configurations can be stored in version control, providing a history of changes and facilitating collaboration.
  • Continuous Deployment: In a CI/CD pipeline, declarative configurations ensure that the deployed application matches the source of truth in your repository.
  • Complex Workloads: Declarative operations shine with complex workloads, where dependencies and the order of operations can become cumbersome to manage imperatively.

Conclusion

In Kubernetes, the choice between declarative and imperative operations boils down to the context of your work. For one-off tasks, imperative commands offer simplicity and speed. However, for managing production workloads and achieving reliable, repeatable deployments, declarative operations are the gold standard.

As you grow in your Kubernetes journey, you’ll likely find yourself using a mix of both approaches. The key is to understand the strengths and limitations of each and choose the right tool for the job at hand.

Remember, Kubernetes is a powerful system that demands respect for its complexity. Whether you choose the imperative wand or the declarative blueprint, always aim for practices that enhance maintainability, scalability, and clarity within your team. Happy orchestrating!

Leveraging Automation in Managing Kubernetes Clusters: The Path to Efficient Operation

Automation in managing Kubernetes clusters has burgeoned into an essential practice that enhances efficiency, security, and the seamless deployment of applications. With the exponential growth in containerized applications, automation has facilitated streamlined operations, reducing the room for human error while significantly saving time. Let’s delve deeper into the crucial role automation plays in managing Kubernetes clusters.

The Imperative of Automation in Kubernetes

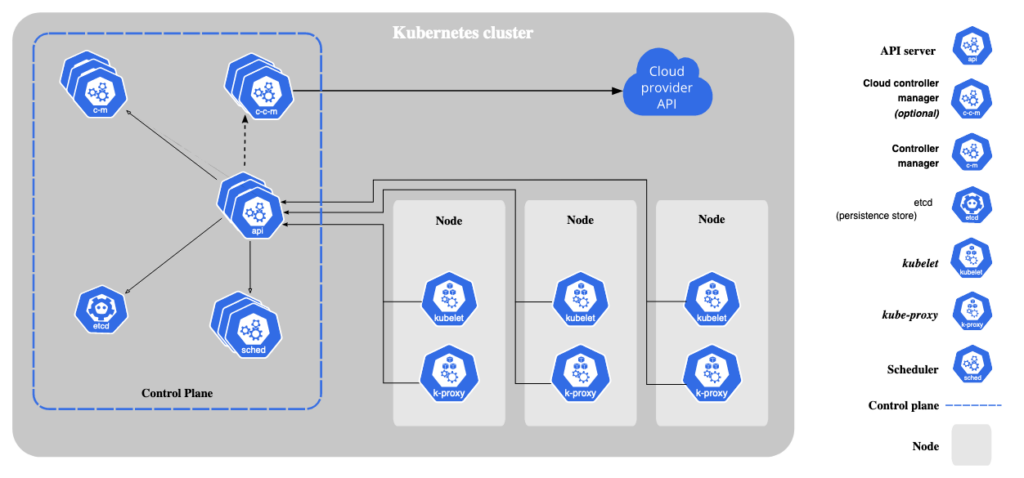
Kubernetes Architecture

The Kubernetes Landscape

Before delving into the nuances of automation, let’s briefly recapitulate the fundamental components of Kubernetes, encompassing pods, nodes, and clusters, and their symbiotic relationships facilitating a harmonious operational environment.

The Need for Automation

Automation emerges as a vanguard in managing complex environments effortlessly, fostering efficiency, reducing downtime, and ensuring the optimal utilization of resources.

Efficiency and Scalability

Automation in Kubernetes ensures that clusters can dynamically scale based on the workload, fostering efficiency, and resource optimization.

Reduced Human Error

Automating repetitive tasks curtails the scope of human error, facilitating seamless operations and mitigating security risks.

Cost Optimization

Through efficient resource management, automation aids in cost reduction by optimizing resource allocation dynamically.

Automation Tools and Processes

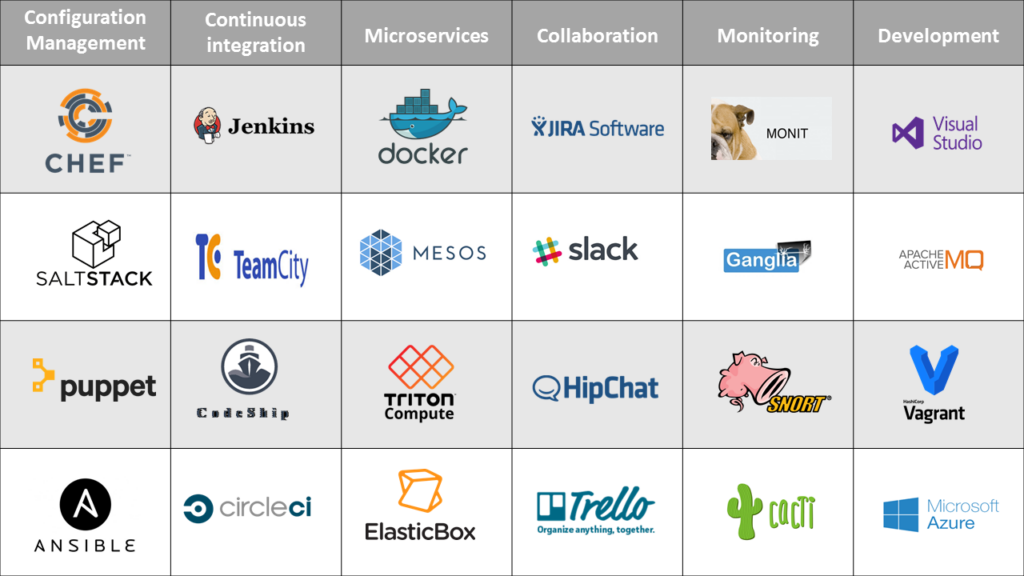
top devops tools

CI/CD Pipelines

Continuous Integration and Continuous Deployment (CI/CD) pipelines are at the helm of automation, fostering swift and efficient deployment cycles.

pipeline:
  build:
    image: node:14
    commands:
      - npm install
      - npm test
  deploy:
    image: google/cloud-sdk
    commands:
      - gcloud container clusters get-credentials cluster-name --zone us-central1-a
      - kubectl apply -f k8s/

Declarative Example 1: A simple CI/CD pipeline example.

Infrastructure as Code (IaC)

IaC facilitates the programmable infrastructure, rendering a platform where systems and devices can be managed through code.

apiVersion: v1
kind: Pod
metadata:
  name: mypod
spec:
  containers:
  - name: mycontainer
    image: nginx

Declarative Example 2: Defining a Kubernetes pod using IaC.

Configuration Management

Tools like Ansible and Chef aid in configuration management, ensuring system uniformity and adherence to policies.

- hosts: kubernetes_nodes
  tasks:
    - name: Ensure Kubelet is installed
      apt: 
        name: kubelet
        state: present

Declarative Example 3: Using Ansible for configuration management.

Section 3: Automation Use Cases in Kubernetes

Auto-scaling

Auto-scaling facilitates automatic adjustments to the system’s computational resources, optimizing performance and curtailing costs.

Horizontal Pod Autoscaler

Kubernetes’ Horizontal Pod Autoscaler automatically adjusts the number of pod replicas in a replication controller, deployment, or replica set based on observed CPU utilization.

apiVersion: autoscaling/v2beta2
kind: HorizontalPodAutoscaler
metadata:
  name: myapp-hpa
spec:
  scaleTargetRef:
    apiVersion: apps/v1
    kind: Deployment
    name: myapp
  minReplicas: 1
  maxReplicas: 10
  metrics:
  - type: Resource
    resource:
      name: cpu
      target:
        type: Utilization
        averageUtilization: 50

Declarative Example 4: Defining a Horizontal Pod Autoscaler in Kubernetes.

Automated Rollouts and Rollbacks

Kubernetes aids in automated rollouts and rollbacks, ensuring application uptime and facilitating seamless updates and reversions.

Deployment Strategies

Deployment strategies such as blue-green and canary releases can be automated in Kubernetes, facilitating controlled and safe deployments.

apiVersion: apps/v1
kind: Deployment
metadata:
  name: myapp
spec:
  strategy:
    type: RollingUpdate
    rollingUpdate:
      maxSurge: 25%
      maxUnavailable: 25%
  selector:
    matchLabels:
      app: myapp
  template:
    metadata:
      labels:
        app: myapp
    spec:
      containers:
      - name: myapp
        image: myapp:v2

Declarative Example 5: Configuring a rolling update strategy in a Kubernetes deployment.

Conclusion: The Future of Kubernetes with Automation

As Kubernetes continues to be the front-runner in orchestrating containerized applications, the automation integral to its ecosystem fosters efficiency, security, and scalability. Through a plethora of tools and evolving best practices, automation stands central in leveraging Kubernetes to its fullest potential, orchestrating seamless operations, and steering towards an era of self-healing systems and zero-downtime deployments.

In conclusion, the ever-evolving landscape of Kubernetes managed through automation guarantees a future where complex deployments are handled with increased efficiency and reduced manual intervention. Leveraging automation tools and practices ensures that Kubernetes clusters not only meet the current requirements but are also future-ready, paving the way for a robust, scalable, and secure operational environment.


References:

  1. Kubernetes Official Documentation. Retrieved from https://kubernetes.io/docs/
  2. Jenkins, CI/CD, and Kubernetes: Integrating CI/CD with Kubernetes (2021). Retrieved from https://www.jenkins.io/doc/book/

Streamline Kubernetes Management through Automation

Automation in managing Kubernetes clusters has burgeoned into an essential practice that enhances efficiency, security, and the seamless deployment of applications. With the exponential growth in containerized applications, automation has facilitated streamlined operations, reducing the room for human error while significantly saving time. Let’s delve deeper into the crucial role automation plays in managing Kubernetes clusters.

Section 1: The Imperative of Automation in Kubernetes

1.1 The Kubernetes Landscape

Before delving into the nuances of automation, let’s briefly recapitulate the fundamental components of Kubernetes, encompassing pods, nodes, and clusters, and their symbiotic relationships facilitating a harmonious operational environment.

1.2 The Need for Automation

Automation emerges as a vanguard in managing complex environments effortlessly, fostering efficiency, reducing downtime, and ensuring the optimal utilization of resources.

1.2.1 Efficiency and Scalability

Automation in Kubernetes ensures that clusters can dynamically scale based on the workload, fostering efficiency, and resource optimization.

1.2.2 Reduced Human Error

Automating repetitive tasks curtails the scope of human error, facilitating seamless operations and mitigating security risks.

1.2.3 Cost Optimization

Through efficient resource management, automation aids in cost reduction by optimizing resource allocation dynamically.

Section 2: Automation Tools and Processes

2.1 CI/CD Pipelines

Continuous Integration and Continuous Deployment (CI/CD) pipelines are at the helm of automation, fostering swift and efficient deployment cycles.

pipeline:
  build:
    image: node:14
    commands:
      - npm install
      - npm test
  deploy:
    image: google/cloud-sdk
    commands:
      - gcloud container clusters get-credentials cluster-name --zone us-central1-a
      - kubectl apply -f k8s/

Code snippet 1: A simple CI/CD pipeline example.

2.2 Infrastructure as Code (IaC)

IaC facilitates the programmable infrastructure, rendering a platform where systems and devices can be managed through code.

apiVersion: v1
kind: Pod
metadata:
  name: mypod
spec:
  containers:
  - name: mycontainer
    image: nginx

Code snippet 2: Defining a Kubernetes pod using IaC.

2.3 Configuration Management

Tools like Ansible and Chef aid in configuration management, ensuring system uniformity and adherence to policies.

- hosts: kubernetes_nodes
  tasks:
    - name: Ensure Kubelet is installed
      apt: 
        name: kubelet
        state: present

Code snippet 3: Using Ansible for configuration management.

Section 3: Automation Use Cases in Kubernetes

3.1 Auto-scaling

Auto-scaling facilitates automatic adjustments to the system’s computational resources, optimizing performance and curtailing costs.

3.1.1 Horizontal Pod Autoscaler

Kubernetes’ Horizontal Pod Autoscaler automatically adjusts the number of pod replicas in a replication controller, deployment, or replica set based on observed CPU utilization.

apiVersion: autoscaling/v2beta2
kind: HorizontalPodAutoscaler
metadata:
  name: myapp-hpa
spec:
  scaleTargetRef:
    apiVersion: apps/v1
    kind: Deployment
    name: myapp
  minReplicas: 1
  maxReplicas: 10
  metrics:
  - type: Resource
    resource:
      name: cpu
      target:
        type: Utilization
        averageUtilization: 50

Code snippet 4: Defining a Horizontal Pod Autoscaler in Kubernetes.

3.2 Automated Rollouts and Rollbacks

Kubernetes aids in automated rollouts and rollbacks, ensuring application uptime and facilitating seamless updates and reversions.

3.2.1 Deployment Strategies

Deployment strategies such as blue-green and canary releases can be automated in Kubernetes, facilitating controlled and safe deployments.

apiVersion: apps/v1
kind: Deployment
metadata:
  name: myapp
spec:
  strategy:
    type: RollingUpdate
    rollingUpdate:
      maxSurge: 25%
      maxUnavailable: 25%
  selector:
    matchLabels:
      app: myapp
  template:
    metadata:
      labels:
        app: myapp
    spec:
      containers:
      - name: myapp
        image: myapp:v2

Code snippet 5: Configuring a rolling update strategy in a Kubernetes deployment.

Conclusion: The Future of Kubernetes with Automation

As Kubernetes continues to be the frontrunner in orchestrating containerized applications, the automation integral to its ecosystem fosters efficiency, security, and scalability. Through a plethora of tools and evolving best practices, automation stands central in leveraging Kubernetes to its fullest potential, orchestrating seamless operations, and steering towards an era of self-healing systems and zero-downtime deployments.

In conclusion, the ever-evolving landscape of Kubernetes managed through automation guarantees a future where complex deployments are handled with increased efficiency and reduced manual intervention. Leveraging automation tools and practices ensures that Kubernetes clusters not only meet the current requirements but are also future-ready, paving the way for a robust, scalable, and secure operational environment.


References:

  1. Kubernetes Official Documentation. Retrieved from https://kubernetes.io/docs/
  2. Jenkins, CI/CD, and Kubernetes: Integrating CI/CD with Kubernetes (2021). Retrieved from https://www.jenkins.io/doc/book/
  3. Infrastructure as Code (IaC) Explained (2021).
  4. Understanding Kubernetes Operators (2021).

Declarative vs Imperative in Kubernetes

To be declarative or to be imperative?

Kubernetes is a powerful tool for orchestrating containerized applications across a cluster of nodes. It provides users with two methods for managing the desired state of their applications: the Declarative and Imperative approaches.

The imperative approach

The Imperative approach requires users to manually issue commands to Kubernetes to manage the desired state of their applications. This approach gives users direct control over the state of their applications, but also requires more manual effort and expertise, as well as a more in-depth understanding of Kubernetes. Additionally, the Imperative approach does not provide any version control or rollback capabilities, meaning that users must be more mindful of any changes they make and take extra care to ensure they are not introducing any unintended consequences.

A simple set of imperative commands to create a deployment

To create a Kubernetes deployment using the Imperative approach, users must issue the following commands:

Create a new deployment named my-deployment and use the image my-image:

kubectl create deployment my-deployment --image=my-image

Scale the deployment to 3 pods:

kubectl scale deployment my-deployment --replicas=3

Declarative approach

In the Declarative approach, users express their desired state in the form of Kubernetes objects such as Pods and Services. These objects are then managed by Kubernetes, which ensures that the actual state of the system matches the desired state without requiring users to manually issue commands. This approach also provides version control and rollback capabilities, allowing users to easily revert back to a previous state if necessary.

Below is an example Kubernetes deployment yaml (my-deployment.yaml) which can be used to create the same Kubernetes deployment:

apiVersion: apps/v1
kind: Deployment
metadata:
  name: my-deployment
  labels:
    app: my-app
spec:
  replicas: 3
  selector:
    matchLabels:
      app: my-app
  template:
    metadata:
      labels:
        app: my-app
    spec:
      containers:
      - name: my-container
        image: my-image:latest
        ports:
        - containerPort: 80

To create or update the deployment using this yaml, use the following command:

kubectl apply -f my-deployment.yaml

Infrastructure as Code

The primary difference between the Declarative and Imperative approaches in Kubernetes is that the Declarative approach is a more automated and efficient way of managing applications, while the Imperative approach gives users more direct control over their applications. Using a Declarative approach to Kubernetes gives rise to managing Infrastructure as Code which is the secret sauce in being able to maintain version control and rollback capabilities.

In general, the Declarative approach is the preferred way to manage applications on Kubernetes as it is more efficient and reliable, allowing users to easily define their desired state and have Kubernetes manage the actual state. However, the Imperative approach can still be useful in certain situations where direct control of the application state is needed. Ultimately, it is up to the user to decide which approach is best for their needs.

Using a dev container in VSCode

How to Use Dev Containers in VSCode

Dev containers are a powerful tool for developers to use when coding, testing, and debugging applications. VSCode provides an integrated development environment (IDE) for developers to use when working with dev containers. This guide will show you how to get started with dev containers in VSCode and how to use them to your best advantage.

  1. Install the Remote – Containers extension
  2. Create a dev container configuration file
  3. Launch the dev container
  4. Connect to the dev container
  5. Start coding!

Installing the Remote – Containers Extension

The first step to using dev containers is to install the Remote – Containers extension. This extension allows you to create dev container configurations and launch them from within VSCode. To install the extension, open the Extensions panel in VSCode and search for Remote – Containers. Click the ‘Install’ button to install the extension. After installation, you will need to restart VSCode for the extension to take effect.

Creating a Dev Container Configuration File

Once the Remote – Containers extension is installed, you can create a dev container configuration file. This file will define the environment for your dev container. For example, you can define the programming language, libraries, and other settings for your dev container. You can also specify a base image to be used by the dev container, such as a Linux or Windows image.

Example Dev Container Configuration File

Below is an example of a dev container configuration file. This configuration file specifies a base image of Ubuntu 18.04, a programming language of Python, and a library of TensorFlow.

{
    "name": "example-dev-container",
    "dockerFile": "Dockerfile",
    "settings": {
        "terminal.integrated.shell.linux": "/bin/bash"
    },
    "remoteUser": "devuser",
    "forwardPorts": [],
    "mounts": [],
    "image": {
        "name": "ubuntu:18.04",
        "remote": false
    },
    "workspaceMount": "/workspace",
    "runArgs": [
        "-v",
        "/workspace:/workspace",
        "-it",
        "--rm",
        "python:3.7.5-stretch"
    ],
    "extensions": [
        "ms-python.python"
    ],
    "libraries": [
        "tensorflow"
    ],
    "postCreateCommand": "",
    "remoteType": "wsl"
}

Launching the Dev Container

Once your dev container configuration file is created, you can launch the dev container. To do this, open the Remote – Containers view in VSCode. You should see your dev container configuration file listed. Click the Launch button to start the dev container. Once the dev container is launched, you will be able to access a terminal window, allowing you to control the dev container.

Connecting to the Dev Container

Once the dev container is running, you can connect to it. To do this, open the Remote – SSH view in VSCode. You should see your dev container listed. Click the Connect button to connect to the dev container. Once connected, you will be able to access the dev container’s terminal window and run commands.

Start Coding!

Now that you’ve connected to the dev container, you can start coding! You can use the integrated development environment (IDE) to write, debug, and test your code. This allows you to work on your project within the dev container, without the need for additional setup. Once you’re done, you can close the dev container and move on to the next project.

Picture showing tools in a circle

7 SRE tools to know today

As an SRE or platform engineer, you’re likely constantly looking for ways to streamline your workflow and make your day-to-day tasks more efficient. One of the best ways to do this is by utilizing popular SRE or DevOps tools. In this post, we’ll take a look at 7 of the most popular tools that are widely used in the industry today and explain their value in terms of how they can help make you more efficient in your day-to-day tasks.

  1. Prometheus: Prometheus is a popular open-source monitoring and alerting system that is widely used for monitoring distributed systems. It allows you to collect metrics from your services and set up alerts based on those metrics. Prometheus is known for its simple data model, easy-to-use query language, and powerful alerting capabilities. With Prometheus, you can quickly and easily identify issues within your systems and be alerted to them before they become a problem.
  2. Grafana: Grafana is a popular open-source visualization tool that can be used to create interactive dashboards and charts based on the metrics collected by Prometheus. It allows you to easily view the health of your systems, identify trends, and spot outliers. With Grafana, you can quickly and easily identify patterns and trends within your data, which can help you optimize your systems and improve their performance.
  3. Kubernetes: Kubernetes is an open-source container orchestration system that allows you to automate the deployment, scaling, and management of containerized applications. It helps you to define, deploy, and manage your application at scale, and to ensure high availability and fault tolerance. With Kubernetes, you can automate many routine tasks associated with deploying and managing your applications, which frees up more time for you to focus on other important tasks.
  4. Ansible: Ansible is an open-source automation tool that can be used to automate the provisioning, configuration, and deployment of your infrastructure. Ansible is known for its simple, human-readable syntax and its ability to easily manage and automate complex tasks. With Ansible, you can automate the provisioning and configuration of your infrastructure, which can help you save time and reduce the risk of errors.
  5. Terraform: Terraform is a popular open-source tool for provisioning and managing infrastructure as code. It allows you to define your infrastructure as code and to use a simple, declarative language to provision and manage resources across multiple providers. With Terraform, you can automate the process of provisioning and managing your infrastructure, which can help you save time and reduce the risk of errors.
  6. Jenkins: Jenkins is an open-source automation server that can be used to automate the building, testing, and deployment of your software. It provides a powerful plugin system that allows you to easily integrate with other tools, such as Git, Ansible, and Kubernetes. With Jenkins, you can automate many routine tasks associated with building, testing, and deploying your software, which frees up more time for you to focus on other important tasks.
  7. GitLab: GitLab is a web-based Git repository manager that provides source code management (SCM), continuous integration, and more. It’s a full-featured platform that covers the entire software development life cycle and allows you to manage your code, collaborate with your team, and automate your pipeline. With GitLab, you can streamline your entire software development process, from code management to deployment, which can help you save time and reduce the risk of errors.

These are just a few examples of the many popular SRE and DevOps tools that are widely used in the industry today.

Here’s to devops…a poem

In devops, we're constantly on call 
Our work is never done, no matter how small 
We're always ready to troubleshoot and fix 
Our skills are diverse, our knowledge is mixed
We're agile and flexible, always adapting 
We're proactive, we're never static 
We're experts in automation and efficiency 
We're the bridge between development and IT
We're passionate about our craft 
We strive for continuous improvement, it's what we're after 
We're the glue that holds everything together 
We're the unsung heroes, working in all kinds of weather
So here's to devops, the backbone of technology 
We may not always get the recognition, but we do it proudly 
We're a vital part of the team, and we know our worth 
We're the devops engineers, bringing stability to this earth

AWS EC2 Spot – Best Practices

Amazon’s EC2 has several options for running instances. On-demand instances is what would be used by most. Reserved instances are used by those who can do some level of usage prediction. Another option which can be a cost saver is using Spot instances. Amazon claims savings up to 90% off regular EC2 rates using Spot instances.

AWS operates like a utility company as such it has spare capacity at any given time. This spare capacity can be purchased through Spot instances. There’s a catch, though. With a 2 minute warning, Amazon can take back that “spare capacity” so using Spot instances needs to be carefully planned. When used correctly Spot instances can be a real cost-saver.

When to use Spot instances

There is a fairly broad set of use cases for using Spot instances. The general consensus is simply containerized, stateless workloads, but in reality there’s a lot more.

  • Distributed databases – think MongoDB or Cassandra or even Elasticsearch. These are distributed so losing one instance would not affect the data; simply start another one
  • Machine Learning – typically these are running training jobs and losing it would only mean the learning stops until another one is started. ML lends itself well to the Spot instance paradigm
  • CI/CD operations – this is a great one for Spot instances
  • Big Data operations – AWS EMR or Spark are also great use cases for Spot instances
  • Stateful workloads – even though these applications would need IP and data persistence, some (maybe even all) of these may be candidates for Spot instances especially if they are automated properly.

Be prepared for disruption

The primary practice for working in AWS in general, but also working with Spot instances is be prepared. Spot instances will be interrupted at some point when it’s least expected. It is critical to create your workload to handle failure. Take advantage of EC2 instance re-balance recommendations and Spot instance interruption notices.

The EC2 re-balance recommendation will notify of an elevated risk of Spot instance interruption in advance of the “2 minute warning”. Using the Capacity Rebalancing feature in Auto-scaling Groups and Spot fleet will provide the ability to be more proactive. Take a look at Capacity Rebalancing for more detail.

If the workloads are “time flexible” configure the Spot instances to stop or hibernate vs terminated when an interruption occurs. When the spare capacity returns the instance will be restarted.

Use the Spot instance interruption notice and the Capacity rebalance notice to your advantage by using the EventBridge to create rules to gracefully handle an interruption. One such example is outlined next.

Using Spot instances with ELB

In a lot of cases Elastic Load Balancer (ELB) is used. Instances are registered and de-registered to the ELB based on health check status. Problem with Spot instances is the instance do not de-register automatically so there may be some interruption if the situation is not handled properly.

The proper way would be to use the interruption notice as a trigger to de-register the instance from the ELB. By programmatically de-registering the Spot instance prior to termination traffic would not be routed to the instance and no traffic would be lost.

Easiest way is to use a Lambda function to trigger based on a Cloudwatch instance termination notice. The Lambda function simply retrieves the instance ID from the event and de-registers the instance from the ELB. As usual, Amazon Solution Architects showed how to do it on the AWS Compute Blog.

Keep your options open

The Spot capacity pool consists of a set of unused EC2 instances with the same instance type (t3.micro, m4.large, etc) and Availability Zone (us-west-1a). Avoid getting too specific on instance types and what zone they use. For instance, avoid specifically requesting c4.large if running the workload on a m5, c5, or m4 family would work the same. Keep specific needs in mind, vertically scaled workloads need more resources and horizontally scaled workloads would find more availability in older generation types as they are in less demand.

Amazon recommends being flexible across at least 10 instance types and there is never a need to limit Availability Zones. Ensure all AZs are enabled in your VPC for your instance to use.

Price and capacity optimized strategy

Take advantage of Auto Scaling groups as the allocation strategies will enable provisioning capacity automatically. The price-capacity-optimized strategy in Spot Fleet due to how the instance capacity is sourced from pools with optimal capacity. This strategy will reduce the possibility of having the Spot instance reclaimed. Dig into the Auto Scaling User Guide Spot Instances section for more detail. Also take a look at this section which describes when workloads have a high cost of interruption.

Think aggregate capacity

Instead of looking at individual instances, Spot enables a more holistic view across units such as vCPUs, network, memory, or storage. Using Spot Fleet with Auto Scaling Groups allows for a higher level view enabling the concept of “target capacity”. Automating the request for more resources to maintain the target capacity of a workload enables considerable flexibility.

Other options to consider

Amazon has a considerable number of services which can be integrated with Spot instances to manage compute costs. Used effectively these services will allow for more flexibility and automation eliminating the need to manage individual instances or fleets. Take a look at the EC2 Spot Workshops for some ideas and examples.

Devops Toolkit for Automation

In the DevOps methodology automation is likely the most important concept. Use “automate everything” as a mantra daily.

Image by Michal Jarmoluk from Pixabay

As an “operator” working in a DevOps role good tools are a necessity. Tools which allow for automating most everything is crucial to keeping up with the vast amount of changes and updates created in a Agile development environment.

Using the same tools your counterparts on the team use will allow for expediting the learning process. In a lot of cases developers use a IDE (Integrated Development Environment) of some sort. Visual Studio Code comes to the forefront, but some ‘hardcore’ or ‘old school’ developers still use Emacs or even Vim as their development tool of choice. There are many out there and each has its pros and cons. Along with a IDE there will be the need for extensions to make things simpler. Let’s outline a few and focus on Visual Studio Code as the tool of choice.

Visual Studio Code is available for most of the commonly used platforms. It has a ton of extensions, but as a “DevOps Engineer” you’ll need a few to make your life easier. First and foremost you’ll want extensions to make working with your favorite cloud provider easier. There are plugins for AWS, GKE, and AKS as well as plugins for yaml, Kubernetes, and Github.

Another extension necessary for container development is the Remote Development Extension Pack. This extension provides the Dev Containers extension allowing for the opening of files and folders inside a container. It also provides a SSH extension to simplify access to remote machines. The Dev Containers extension will want to use Docker Desktop, but a better alternative is Rancher Desktop.

Rancher Desktop is another superb tool for several reasons.

  • 100% open source
  • Includes K3s as the Kubernetes distribution
  • Can use with dockerd (moby) or containerd
  • Basic dashboard
  • Easy to use

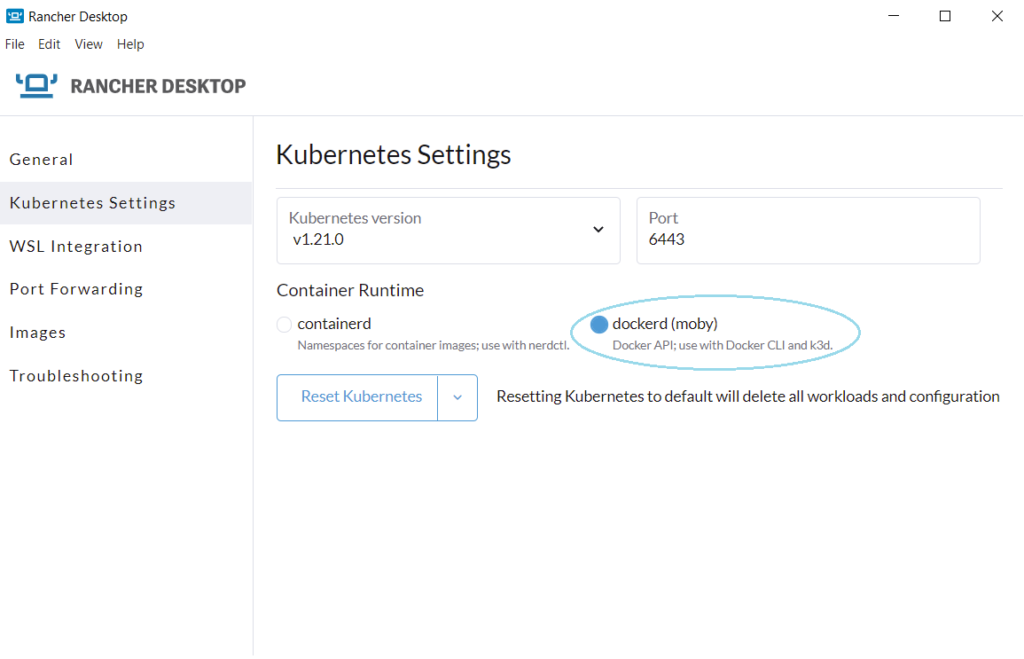
To get started with it, download Rancher Desktop and install on your favorite platform. Follow the installation instructions and once installed go to the preferences page and select “dockerd (moby)” as shown below.

Rancher Desktop Kubernetes Settings

Now that you have Rancher Desktop installed as well as Visual Studio Code with all of the extensions take some time to get familiar with it. Best to start with your github account and create or fork a repository to work with inside Visual Studio Code. Reading through the various getting started docs yields hours of things to try or work with to learn.

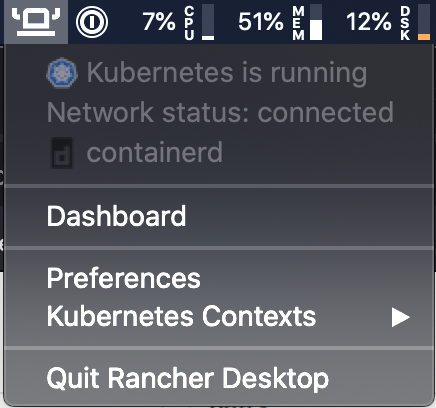
To get started with your Rancher Desktop cluster simply click on the Rancher Desktop icon. In most windowed environments there’s a icon in the “task bar”.

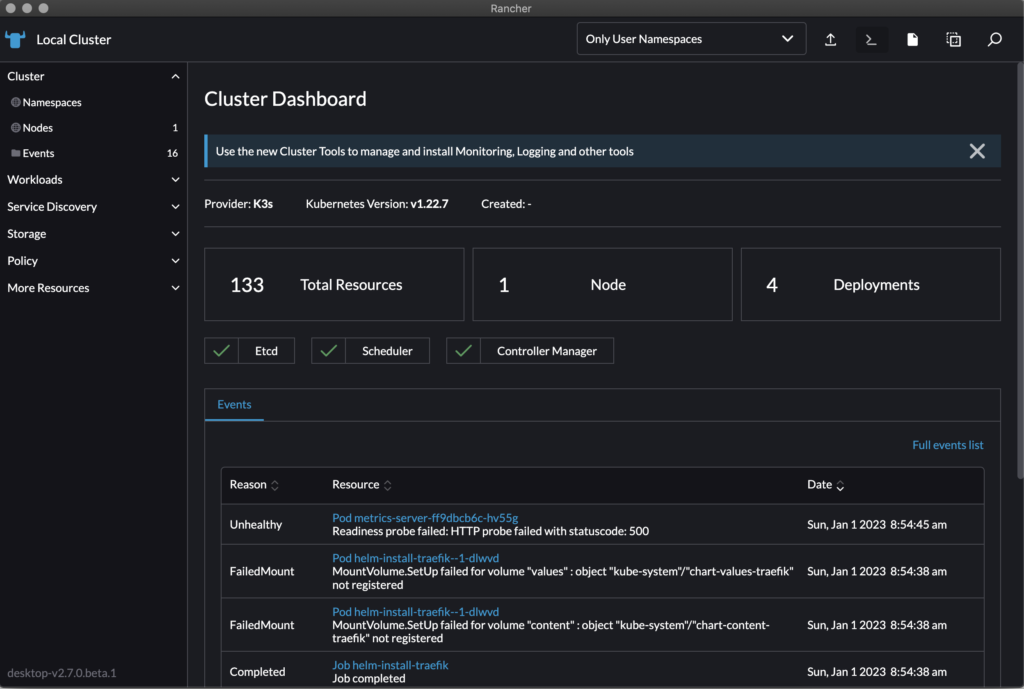
Click on the Dashboard link to get access to view the K3s cluster installed when Rancher Desktop started.

Another way to access the cluster is to use kubectl. A number of utilities were installed to ~/.rd/bin. Use kubectl get nodes to view the node(s) in your cluster or use kubectl get pods -A to view all of the pods in the cluster.

Many utilities exist to view/manage Kubernetes clusters. Great learning experiences come from experimentation.

A lot was accomplished in this post. From a bit of reading to manipulating a Kubernetes cluster there is a lot of information to absorb. Visual Studio Code will be the foundation for a lot of the work done in the DevOps world. Containers and Kubernetes will be the foundation for the execution of the work created. This post provided the building blocks to combine the Dev and the Ops with what’s needed to automate the process.

Next up…building a simple CI/CD pipeline.